> For the complete documentation index, see [llms.txt](https://help.aikido.dev/llms.txt). Markdown versions of documentation pages are available by appending `.md` to page URLs; this page is available as [Markdown](https://help.aikido.dev/docs/docs-ja/hajimeni/task-management-systems/all-supported-task-trackers/jira-data-center.md).
# Jira Data Center
この記事では、Jira Data Center を稼働させている企業、つまりオンプレミス版 Jira(Jira Cloud とは異なる)に焦点を当てています。 [Jira Cloud](https://help.aikido.dev/en/articles/8680218-setting-up-automated-task-creation-in-jira-cloud))。以下の一度だけ行うセットアップ *ワークスペースごとに* Aikido 組織の全員が Jira オンプレミスで直接課題を作成できるようにします。
以下のユースケースがサポートされています:
* 自動チケット作成: セキュリティ問題をシームレスに追跡できるよう、指定した Jira プロジェクトにチケットを自動作成して送信します。
* 手動チケット追加: セキュリティ問題のチケットを手動で Jira に追加し、重大な脆弱性に的を絞って対応できるようにします。
### 前提条件
JIRA Data Center への接続を行うには、個人用アクセストークンを作成する必要があります。このトークンは、その後、インスタンスへのすべてのリクエストを実行するために使用されます。\
\
ご注意ください。連携が持つアクセス権は、個人用アクセストークン(PAT)を作成した人と同等になります。そのため、環境内で十分なアクセス権を持つ人に PAT を作成してもらうことをお勧めします。
PAT を作成するには、以下の手順に従ってください:
1. JIRA Data Center 環境に移動します
2. 上部のナビゲーションバーにあるアバターをクリックし、「Profile」に移動します
3. 「Personal Access Tokens」をクリックすると、以下のような画面に移動します****

4. 「Create token」をクリックし、適切な名前を付けます
5. 有効期限は設定しないことをお勧めしますが、設定する場合は、Aikido のトークンを定期的に更新する必要があることを忘れないでください
6. トークンが作成されると、すぐにコピーできるようになります。コピーして次の手順まで保管してください
### Aikido アプリを Jira に接続する
1. 次へ移動します [Integration Settings](https://app.aikido.dev/settings/integrations) Aikido アプリ内で。
2. 「Task Trackers」セクションで、「Jira Data Center」を選択します
3. 環境の URL を入力します
4. 前の手順で取得した PAT を入力し、「Save」をクリックします****

5. 認証が完了すると、Aikido は Jira に正常に接続され、タスク管理機能が強化されます 🚀

### Aikido 経由で Jira にタスクを作成するためのオプション
Aikido から Jira に新しいタスクを作成する方法には、2 つの異なるオプションがあります。
1. Aikido インターフェースからタスクを手動で作成する
2. Aikido の自動作成機能を使って新しいタスクを自動的に作成します。
### 1. 手動タスク作成
1. フィード内の任意の課題にカーソルを合わせ、 *+* assign 列で。****
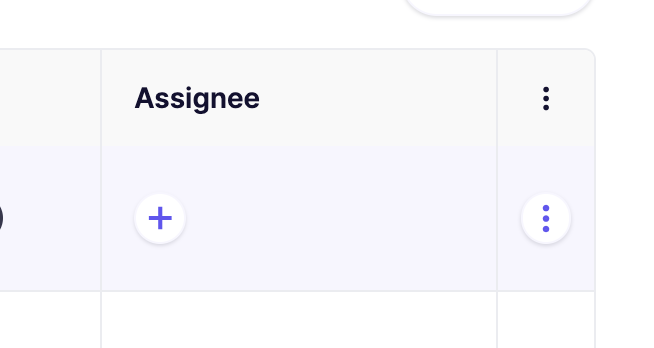
別の方法として、最後の列にある三点リーダーをクリックするとアクションメニューが開きます。issueをグループ化している場合、三点リーダーのアクションメニューは各サブissueで利用できます。\

2. ポップアップモーダルで必要な詳細を入力します。\

3. Jira で新規作成されたタスクは、Aikido の課題詳細の「Tasks」タブ(サイドパネル)にリンクされます。

### 2. 自動タスク作成
{% hint style="info" %}
Aikidoはタスクを自動的に作成します **毎時、一括で。** 現時点では、これを手動で実行するオプションはありません。
{% endhint %}
1. 次へ移動します [Jira 連携](https://app.aikido.dev/settings/integrations/tasktracker) 設定
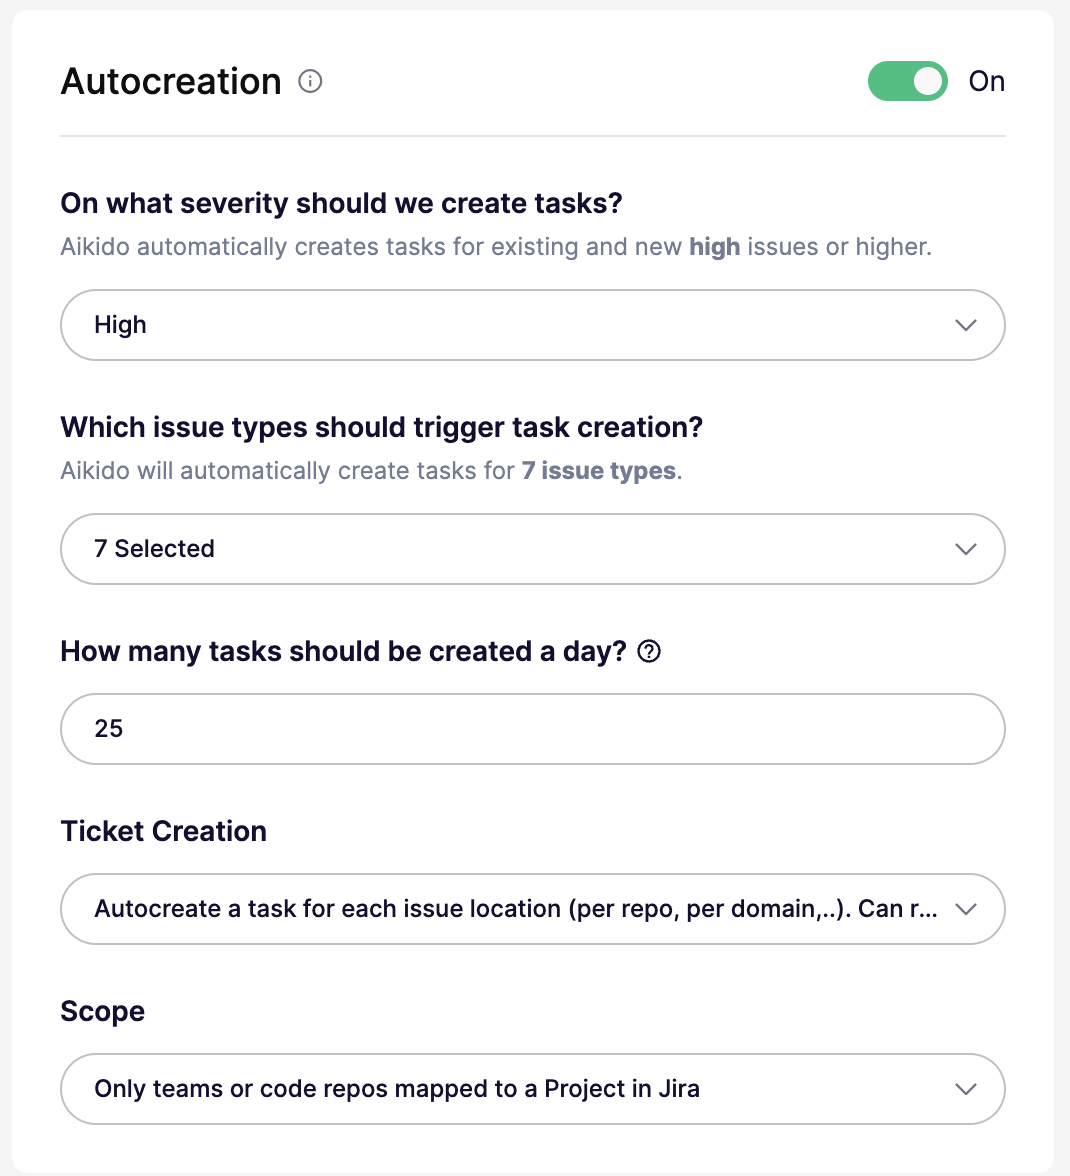
2. トグルを On にして「Autocreation」を有効にしてください。
3. に切り替えます。
これらの設定はすべて自動作成モーダルで構成できます:
* **オン/オフ:** 自動作成を有効または無効にします。オフの場合、しきい値は実質的に次の値に設定されます `なし`.
* **重大度しきい値:** 次の重大度の問題についてチケットを作成します `重大`, `高`, `中`、または `低` 以上。たとえば、 `高` では、次のものについてチケットを作成します `高` および `重大`.
* **問題の種類:** すべての問題タイプについてチケットを作成するか、次のような特定のタイプに限定します `SCA`, `SAST`, `シークレット`, `クラウド`, `IaC`, `マルウェア`、または `ライセンス`.
* **1日あたりの上限:** 1日に作成されるチケットの最大数を設定します。既定値は `25`です。一部のプランでは、より高い上限をサポートしています。
* **チケット作成モード:** 問題グループごとに1件のチケットを作成するか、場所またはスコープごとに個別のチケットを作成します。場所ごとのモードでは、より多くのチケットが作成される場合があります。
* **スコープ:** 場所ごとのモードでのみ使用できます。すべてのリポジトリまたはクラウド、マッピング済みのリポジトリまたはチームのみ、または含める/除外するリストを使用して特定のリポジトリまたはクラウドを対象にします。
4. その後、Aikido がこれらの設定に基づいて Jira チケットを自律的に生成します 🚀
***
---
# Agent Instructions
This documentation is published with GitBook. GitBook is the documentation platform designed so that both humans and AI agents can read, navigate, and reason over technical content effectively. Learn more at gitbook.com.
## Querying This Documentation
If you need additional information that is not directly available in this page, you can query the documentation dynamically by asking a question.
Perform an HTTP GET request on the current page URL with the `ask` query parameter, and the optional `goal` query parameter:
```
GET https://help.aikido.dev/docs/docs-ja/hajimeni/task-management-systems/all-supported-task-trackers/jira-data-center.md?ask=&goal=
```
`ask` is the immediate question: it should be specific, self-contained, and written in natural language.
`goal` is optional and describes the broader end goal you are ultimately trying to accomplish on behalf of the user. GitBook uses it to tailor the answer towards what is most useful for that goal.
The response will contain a direct answer to the question and relevant excerpts and sources from the documentation.
Use this mechanism when the answer is not explicitly present in the current page, you need clarification or additional context, or you want to retrieve related documentation sections.