> For the complete documentation index, see [llms.txt](https://help.aikido.dev/llms.txt). Markdown versions of documentation pages are available by appending `.md` to page URLs; this page is available as [Markdown](https://help.aikido.dev/docs/docs-ja/kdosukyan/connect-your-source-code/connect-gitlab-self-managed-server-to-aikido.md).
# GitLab Self-Managed Serverを接続する
Aikidoでは、セルフマネージドのGitLabインスタンスを接続して、コードをスキャンし保護できます。以下の手順に従って、GitLabサーバーをAikidoに接続してください。
### 始める前に
* GitLabがファイアウォールの内側にある場合は、 [AikidoのIPアドレスを許可リストに追加してください](/docs/docs-ja/kdosukyan/miscellaneous/allowing-ip-addresses-for-code-container-scanning.md) そうすればAikidoからアクセスできます。
* この設定を行う人は、GitLabインスタンスにアクセスできる必要があります **および** 接続したいGitLabグループにもアクセスできる必要があります。
{% hint style="warning" %}
Aikidoのワークスペースは常に1つのGitLabグループに対応します。
Aikidoを、すべてのサブグループを含むトップレベル(ルート)グループに接続することをおすすめします。ルートグループがない場合は、GitLabグループごとに1つのワークスペースを作成してください。最初のワークスペースを作成した後、左上のドロップダウンから「Add another workspace」を選択して行えます。
{% endhint %}
## 設定
{% stepper %}
{% step %}
**Aikidoアカウントを作成**
GitLabサーバーを接続するには、まずGoogleまたはMicrosoftを使ってAikidoにサインアップするかログインしてください。 [サインアップ画面](https://app.aikido.dev/login)、次をクリックします: **Google / Microsoft**.
{% endstep %}
{% step %}
**GitLabのセットアップを開始**
認証が完了したら、新しいワークスペースを作成するには **Self-Managed** GitLabセクションで。
{% endstep %}
{% step %}
**GitLabの詳細を入力**
ワークスペースを作成するには、Aikidoが接続できるように、セルフマネージドのGitLabインスタンスに関するいくつかの情報を入力してください。
{% hint style="info" %}
GitLabがファイアウォールの内側で動作している場合は、 [AikidoのIPアドレスを許可リストに追加してください](/docs/docs-ja/kdosukyan/miscellaneous/allowing-ip-addresses-for-code-container-scanning.md) それにアクセスできるようにしてください。もしそれができない場合は、 [Brokerのセットアップガイド](/docs/docs-ja/kdosukyan/connect-your-source-code/connect-gitlab-self-managed-server-to-aikido/connect-gitlab-self-managed-server-broker-set-up.md).
{% endhint %}
最初の入力欄にGitLabサーバーのURLを入力してください。
{% endstep %}
{% step %}
**GitLabの個人アクセストークン(PAT)を作成**
次に、個人アクセストークン(PAT)を作成してください。専用のサービスアカウントを使用することをおすすめします。
* GitLab サーバーにログインしてください
* 管理エリアに移動し(`/admin`)
* 次へ移動してください: **設定** → **サービスアカウント**
* クリック: **サービスアカウントを追加**、名前を入力してから保存します
{% hint style="warning" %}
サービスアカウントを、他のユーザーと同様に、接続したい GitLab グループに追加します。GitLab のドキュメントの [グループメンバー](https://docs.gitlab.com/ee/user/group/members/).
{% endhint %}
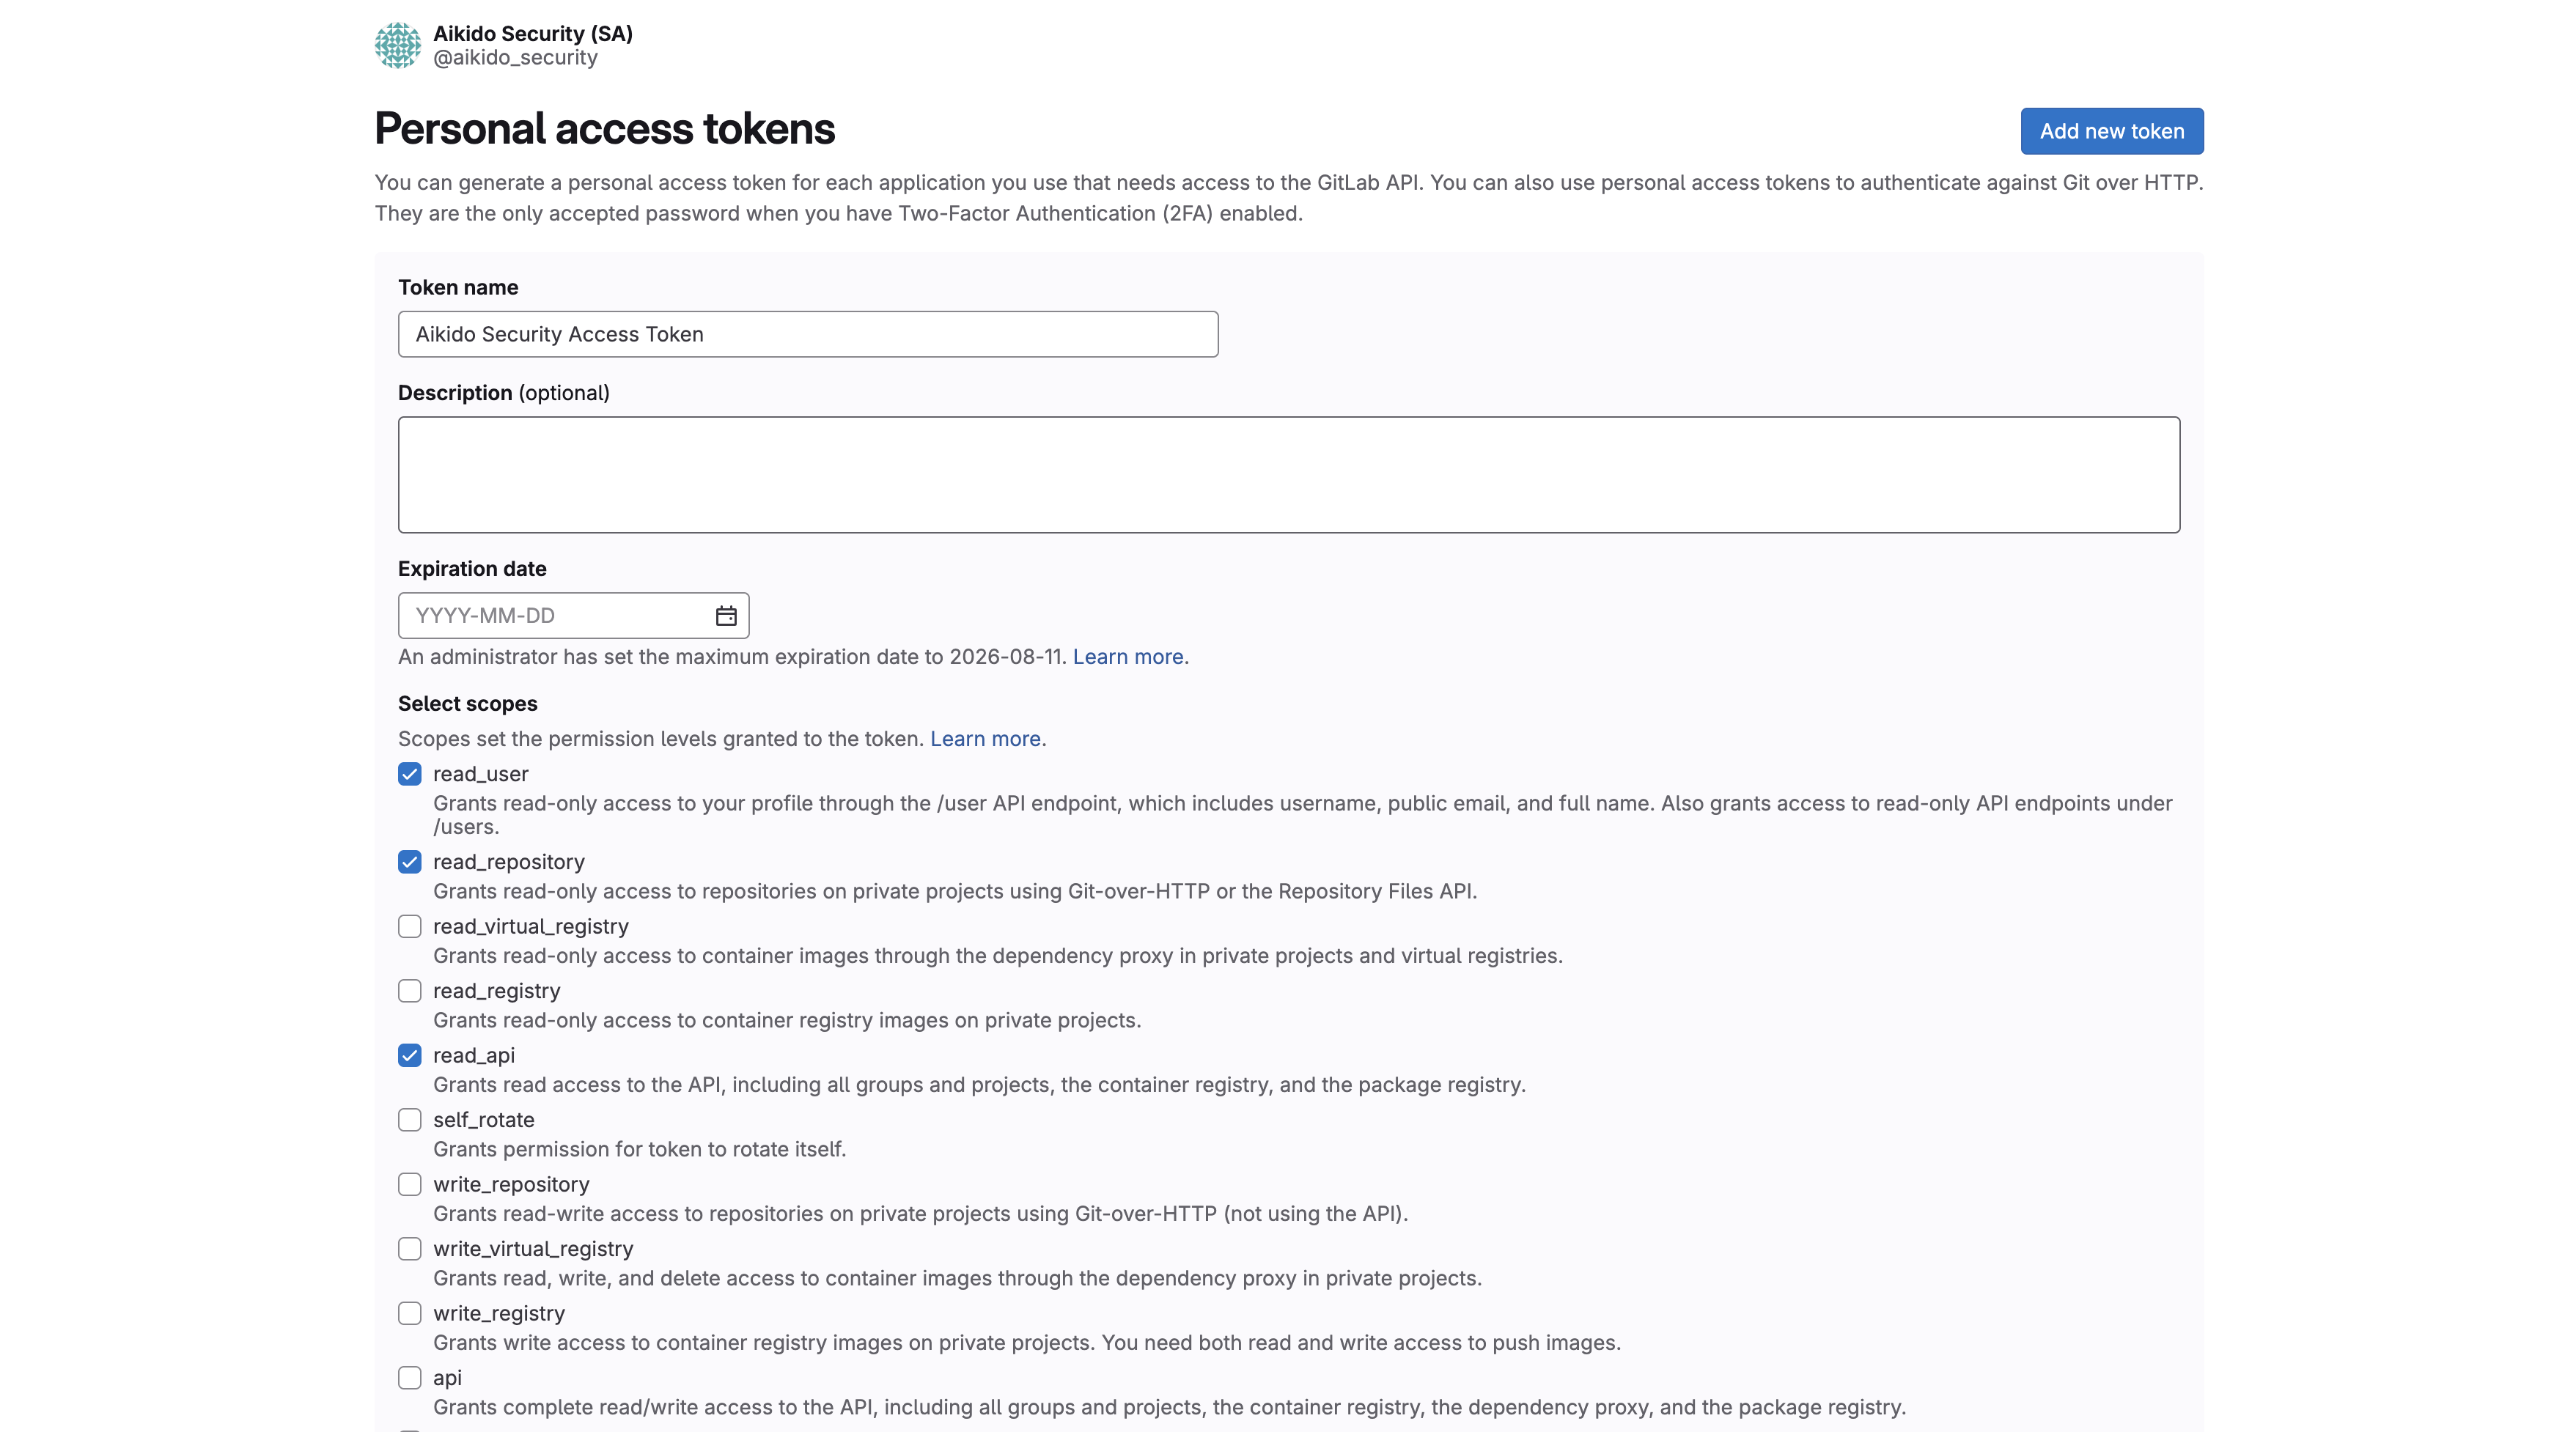
サービスアカウントが作成されたので、3 つの点をクリックし、「**アクセス トークンの管理**"
* 「**新しいトークンを追加**"
* トークンの名前を入力します。例: `Aikido Security Access Token`
* 有効期限は、社内ポリシーに合うように設定してください。トークンは期限切れ前にローテーションしてください。
* 次のスコープを選択する必要があります:
* **read\_user**
* **read\_api**
* **read\_repository**
* 次をクリック: **トークンを作成** フォームの下部にあるボタン。
* 画面に表示されているトークンをコピーし、入力欄に入力してください。
**重要:** この画面を離れると、トークンは再び表示されません。続行する前にコピーしてください。
AikidoがGitLabサーバーへの接続を確認します。失敗した場合は、サーバーURLとトークンを再確認してください。
{% endstep %}
{% step %}
**インストールを完了する**
をクリックしたら **次に、グループを接続**、最初に使用するグループを選択してください。後からいつでもさらにグループを接続できます。
最後の手順で、Aikidoに監視させたいリポジトリを選択してください。
{% endstep %}
{% step %}
{% endstep %}
{% endstepper %}
---
# Agent Instructions
This documentation is published with GitBook. GitBook is the documentation platform designed so that both humans and AI agents can read, navigate, and reason over technical content effectively. Learn more at gitbook.com.
## Querying This Documentation
If you need additional information that is not directly available in this page, you can query the documentation dynamically by asking a question.
Perform an HTTP GET request on the current page URL with the `ask` query parameter, and the optional `goal` query parameter:
```
GET https://help.aikido.dev/docs/docs-ja/kdosukyan/connect-your-source-code/connect-gitlab-self-managed-server-to-aikido.md?ask=&goal=
```
`ask` is the immediate question: it should be specific, self-contained, and written in natural language.
`goal` is optional and describes the broader end goal you are ultimately trying to accomplish on behalf of the user. GitBook uses it to tailor the answer towards what is most useful for that goal.
The response will contain a direct answer to the question and relevant excerpts and sources from the documentation.
Use this mechanism when the answer is not explicitly present in the current page, you need clarification or additional context, or you want to retrieve related documentation sections.